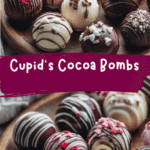
Indulge in the Magic of Cupid’s Cocoa Bombs This Valentine’s Day
There’s something about the way a warm cup of cocoa can wrap around you like a soft blanket on a chilly mountain evening. Growing up in that white farmhouse tucked deep in the Blue Ridge Mountains, Mama Lu’s kitchen was often filled with the rich scent of chocolate mixed with the laughter of family gathered close. Today, I’m excited to share a recipe that takes that comforting feeling a step further — Cupid’s Cocoa Bombs. These little chocolate spheres are more than just a treat; they’re a small celebration of love, warmth, and the kind of togetherness that defined my childhood. Pull up a chair, and let’s make something sweet that carries a bit of that mountain magic right into your home.
Table of Contents
Why You’ll Love This Cupid’s Cocoa Bombs
In my years of cooking and writing, I’ve come to cherish recipes that go beyond flavor — those that tell a story, evoke a memory, and make you feel seen and grounded. Cupid’s Cocoa Bombs do just that. They’re a playful twist on classic hot chocolate, designed to melt heart and soul with every sip. These bombs hold a hidden treasure of cocoa and marshmallows, waiting to burst open into a steaming cup of indulgence.
When I first tried a cocoa bomb, it reminded me of the surprise sweetness Mama Lu would tuck into her cornbread or the way a simple blackberry jam could brighten a cloudy afternoon on the porch. It’s that unexpected joy that makes these bombs so special. Plus, they’re a fun project — perfect for gifting or cozying up with someone special on a cold night.
And here’s the thing: making them connects you to a tradition of sharing and caring, much like the family rituals I grew up with. You don’t need fancy tools or an advanced kitchen — just a little patience, some good chocolate, and a heart ready to make memories.
Ingredients You’ll Need for This Cupid’s Cocoa Bombs

- 8 ounces high-quality semi-sweet chocolate (or milk chocolate if you prefer sweeter)
- 1/2 cup mini marshmallows
- 1/4 cup unsweetened cocoa powder
- 2 tablespoons powdered sugar
- 1/4 teaspoon fine sea salt
- 1 teaspoon vanilla extract
- Hot cocoa mix (about 2 tablespoons per bomb for filling)
- Optional: crushed peppermint candies or cinnamon for a festive twist
Substitution tips: If you’re dairy-free, swap the chocolate for a vegan chocolate bar, and use a dairy-free hot cocoa powder. For a richer flavor, try dark chocolate instead of semi-sweet. And if mini marshmallows are hard to find, regular marshmallows cut into small pieces work just fine.
Nutrition Facts
- Calories: Approximately 220 per cocoa bomb
- Protein: 2 grams
- Fat: 12 grams
- Carbohydrates: 28 grams
- Fiber: 3 grams
- Sugar: 20 grams
- Sodium: 70 milligrams
These numbers are an estimate based on the size of each bomb and ingredients used. Remember, this treat is meant to be savored — a little bit goes a long way, just like Mama Lu’s cornbread, which taught me that richness comes from quality, not quantity. Learn more: How to Make Pink Latte The Perfect Vibrant Twist to Your Morning Brew
PrintIndulge in the Magic of Cupid’s Cocoa Bombs This Valentine’s Day

Learn how to make delicious Cupid’s Cocoa Bombs. Easy recipe with step-by-step instructions.
- Prep Time: 15 minutes
- Cook Time: 30 minutes
- Total Time: 45 minutes
- Yield: 4 servings 1x
- Category: Main Dish
- Method: Cooking
- Cuisine: International
Ingredients
- 8 ounces high-quality semi-sweet chocolate (or milk chocolate if you prefer sweeter)
- 1/2 cup mini marshmallows
- 1/4 cup unsweetened cocoa powder
- 2 tablespoons powdered sugar
- 1/4 teaspoon fine sea salt
- 1 teaspoon vanilla extract
- Hot cocoa mix (about 2 tablespoons per bomb for filling)
- Optional: crushed peppermint candies or cinnamon for a festive twist
Substitution tips: If you’re dairy-free, swap the chocolate for a vegan chocolate bar, and use a dairy-free hot cocoa powder. For a richer flavor, try dark chocolate instead of semi-sweet. And if mini marshmallows are hard to find, regular marshmallows cut into small pieces work just fine.
Instructions
- Start by melting your chocolate slowly. I like to do this over a double boiler — a heatproof bowl set over simmering water — stirring frequently until smooth. If you don’t have one, a microwave works fine; heat in 20-second bursts, stirring each time to avoid scorching.
- Using a silicone half-sphere mold (about 2-inch diameter), spoon a tablespoon of melted chocolate into each cavity. Tilt the mold to coat the sides evenly, then pour out any excess. This step is like painting thin layers — you want a sturdy shell but not too thick.
- Place the mold in the fridge for 10-15 minutes to let the chocolate set firmly. This chilling reminds me of those brisk mountain mornings, where a little patience made the best biscuits.
- Once set, gently remove the chocolate half-spheres from the mold. Take two halves to form one bomb.
- Fill the inside of one half with about 2 tablespoons of hot cocoa mix, a pinch of cocoa powder and powdered sugar blend, and a handful of mini marshmallows. Add a drop of vanilla extract into the cocoa mix for that deep, warm flavor Mama Lu would coax out in her recipes.
- Warm a plate slightly in the microwave. Press the rim of the filled half-sphere onto the warm plate for a few seconds to soften the edges.
- Quickly press the softened edge against the rim of an empty half-sphere to seal the bomb. Hold gently for a few seconds to secure. If you like, you can brush a little melted chocolate around the seam for extra hold.
- Place the sealed bombs back in the fridge for 10 more minutes to harden completely.
- When you’re ready to enjoy, place one bomb in a mug and pour hot milk (or your favorite milk alternative) over it. Watch the magic unfold as the shell melts and releases the cocoa mix and marshmallows.
Back in the farmhouse kitchen, this would be the moment Mama Lu’s stories would start — tales told between sips and the clinking of spoons. That’s the kind of warmth these cocoa bombs bring.
Steps to Create Your Cupid’s Cocoa Bombs
- Start by melting your chocolate slowly. I like to do this over a double boiler — a heatproof bowl set over simmering water — stirring frequently until smooth. If you don’t have one, a microwave works fine; heat in 20-second bursts, stirring each time to avoid scorching.
- Using a silicone half-sphere mold (about 2-inch diameter), spoon a tablespoon of melted chocolate into each cavity. Tilt the mold to coat the sides evenly, then pour out any excess. This step is like painting thin layers — you want a sturdy shell but not too thick.
- Place the mold in the fridge for 10-15 minutes to let the chocolate set firmly. This chilling reminds me of those brisk mountain mornings, where a little patience made the best biscuits.
- Once set, gently remove the chocolate half-spheres from the mold. Take two halves to form one bomb.
- Fill the inside of one half with about 2 tablespoons of hot cocoa mix, a pinch of cocoa powder and powdered sugar blend, and a handful of mini marshmallows. Add a drop of vanilla extract into the cocoa mix for that deep, warm flavor Mama Lu would coax out in her recipes.
- Warm a plate slightly in the microwave. Press the rim of the filled half-sphere onto the warm plate for a few seconds to soften the edges.
- Quickly press the softened edge against the rim of an empty half-sphere to seal the bomb. Hold gently for a few seconds to secure. If you like, you can brush a little melted chocolate around the seam for extra hold.
- Place the sealed bombs back in the fridge for 10 more minutes to harden completely.
- When you’re ready to enjoy, place one bomb in a mug and pour hot milk (or your favorite milk alternative) over it. Watch the magic unfold as the shell melts and releases the cocoa mix and marshmallows.
Back in the farmhouse kitchen, this would be the moment Mama Lu’s stories would start — tales told between sips and the clinking of spoons. That’s the kind of warmth these cocoa bombs bring.
Tips for Making the Best Cupid’s Cocoa Bombs
- Quality chocolate matters: The flavor and texture of your bombs hinge on the chocolate you choose. I always reach for a bar that melts smoothly and tastes rich, just like Mama Lu’s careful selection of the freshest ingredients.
- Don’t rush the chilling: Letting the chocolate set fully before assembling keeps the shells from cracking. It’s a little like waiting for dough to rise — patience pays off.
- Seal with care: Make sure the edges are warm enough to stick but not so hot they melt the whole half-sphere. A gentle touch is key, much like when Mama Lu would fold biscuit dough just so.
- Customize your filling: Add a pinch of cinnamon, a few crushed peppermint candies, or even a sprinkle of cayenne for a little kick. These bombs are your canvas.
- Work quickly when sealing: Chocolate hardens fast, so have your materials ready before melting the edges.
Serving Suggestions and Pairings

Serving Cupid’s Cocoa Bombs is an invitation to slow down and savor. Here are a few ways I like to enjoy — and share — them:
- Pour over warm whole milk or a creamy oat milk for a naturally sweet and comforting cup.
- Pair with a slice of homemade cornbread or cinnamon-spiced biscuits for a touch of that Blue Ridge mountain charm.
- For an adult twist, add a splash of bourbon or peppermint schnapps into your mug before pouring the milk.
- Serve alongside fresh fruit like sliced apples or pears to balance the richness.
- Wrap a few bombs in parchment and tie with twine for an easy, heartfelt gift that says “I’m thinking of you.”
Some of my fondest memories involve sharing food that felt like a hug — these cocoa bombs fit right into that tradition.
Storage and Reheating Tips
Cupid’s Cocoa Bombs are best enjoyed fresh but can be stored for future cozy moments. Here’s how to keep them at their best:
- Store in an airtight container at room temperature, away from heat and sunlight. They’ll keep well for up to two weeks.
- If you live in a warmer climate, refrigeration is fine, but bring the bombs back to room temperature before serving to avoid condensation.
- Do not freeze — the moisture can cause the chocolate to bloom or the marshmallows to get soggy.
- Reheating isn’t necessary since they melt directly in your hot milk, but if you want to soften them gently before serving, place them near a warm spot (not direct heat) for 10 minutes.
Frequently Asked Questions
What are the main ingredients for Cupid’s Cocoa Bombs?
The main ingredients for Cupid’s Cocoa Bombs include the items listed in our ingredients section above. Each ingredient plays a crucial role in achieving the perfect flavor and texture.
How long does it take to make Cupid’s Cocoa Bombs?
The total time to make Cupid’s Cocoa Bombs includes both preparation and cooking time. Check the recipe card above for exact timing details.
Can I make Cupid’s Cocoa Bombs ahead of time?
Yes, Cupid’s Cocoa Bombs can often be prepared in advance. Store it properly in an airtight container in the refrigerator and consume within the recommended timeframe.
What can I serve with Cupid’s Cocoa Bombs?
Cupid’s Cocoa Bombs pairs well with various sides and accompaniments. Consider the serving suggestions mentioned in the recipe for the best dining experience.
Is Cupid’s Cocoa Bombs suitable for special diets?
Depending on the ingredients used, Cupid’s Cocoa Bombs may be adapted for various dietary needs. Check the ingredients list and consider substitutions as needed for your dietary requirements.
Final Thoughts
Making Cupid’s Cocoa Bombs reminded me of those quiet afternoons on the farmhouse porch, where food wasn’t just about hunger but about love and stories passed down through generations. These bombs are a modern nod to that tradition — simple ingredients, a little patience, and a whole lot of heart coming together in a magical way.
“Recipes weren’t written,” Mama Lu would say with a smile. “They were remembered. Shared by heart, with a pinch of salt and a whole lot of soul.”
So whether you’re crafting these bombs for a Valentine’s Day surprise, a cozy night in, or a gift for a friend who needs a little sweetness, know that you’re carrying on a legacy of comfort and connection. From my Blue Ridge kitchen to yours, I hope these Cupid’s Cocoa Bombs fill your home with warmth, laughter, and a little extra love.