Spooky and Sweet Halloween Cookies to Delight Your Taste Buds

Learn how to make delicious halloween cookies. Easy recipe with step-by-step instructions.
- Prep Time: 15 minutes
- Cook Time: 30 minutes
- Total Time: 45 minutes
- Yield: 4 servings 1x
- Category: Main Dish
- Method: Cooking
- Cuisine: International
Ingredients
Scale
- 2 ¾ cups all-purpose flour
- 1 teaspoon baking powder
- ½ teaspoon baking soda
- 1 teaspoon ground cinnamon
- ½ teaspoon ground nutmeg
- ½ teaspoon salt
- ¾ cup unsalted butter, softened
- 1 cup granulated sugar
- 1 large egg
- 1 teaspoon vanilla extract
- 2 tablespoons whole milk
- Optional for decorating: powdered sugar, royal icing, or colored sugar sprinkles
If you’re looking to make these cookies a bit heartier, I sometimes swap out half the all-purpose flour for whole wheat pastry flour—Mama Lu always believed in making do with what you had. Or, for a dairy-free version, coconut oil works beautifully in place of butter, though it gives a slightly different texture and flavor.
Instructions
- Preheat your oven to 350°F (175°C) and line two baking sheets with parchment paper. This helps the cookies bake evenly and prevents sticking—something Mama Lu taught me early on when we’d bake on the old, worn kitchen table.
- In a medium bowl, whisk together the flour, baking powder, baking soda, cinnamon, nutmeg, and salt. This blend of spices is what sets these halloween cookies apart, giving them that warm, autumnal hug.
- In a large bowl, beat the softened butter and granulated sugar together until light and fluffy. It usually takes about 3-4 minutes with an electric mixer or a good arm workout by hand. This step is key to getting that tender crumb Mama Lu’s skillet cornbread was famous for.
- Beat in the egg and vanilla extract until fully incorporated. The egg binds everything together, while the vanilla adds a subtle depth that makes these cookies feel like home.
- Gradually add the dry ingredients to the wet, mixing just until combined. Overmixing can make cookies tough, and that’s a mistake I’ve learned to avoid after many a batch.
- Stir in the milk to bring the dough together—it should be soft but not sticky. If it feels too wet, add a little more flour, a tablespoon at a time.
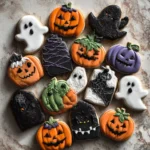
- Turn the dough out onto a lightly floured surface and roll it to about ¼-inch thickness. Now comes the fun part—cutting out shapes! I still remember bending over the kitchen counter with Mama Lu, our hands dusted in flour, pressing out leaves, pumpkins, and ghosts.
- Place the cutouts on your prepared baking sheets about 2 inches apart. This gives them room to spread without losing their shape.
- Bake for 10-12 minutes, or until the edges just start to turn golden. Keep a close eye—the smell will be irresistible, and the cookies can go from perfect to overdone in a flash.
- Remove from the oven and let the cookies cool on the baking sheets for 5 minutes before transferring to a wire rack to cool completely. This resting time helps them firm up just right, ready for decorating or enjoying as-is.
Find it online: https://claracooking.com/halloween-cookies/