How Rosemary Roasted Squash Will Transform Your Fall Dinner Menu
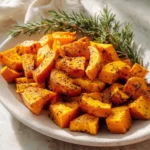
Learn how to make delicious Rosemary Roasted Squash. Easy recipe with step-by-step instructions.
- Prep Time: 15 minutes
- Cook Time: 30 minutes
- Total Time: 45 minutes
- Yield: 4 servings 1x
- Category: Main Dish
- Method: Cooking
- Cuisine: International
Ingredients
Scale
- 1 medium butternut squash (about 2–3 pounds), peeled, seeded, and cut into 1-inch cubes
- 2 tablespoons extra virgin olive oil (or melted butter for a richer flavor)
- 2 teaspoons fresh rosemary leaves, finely chopped (or 1 teaspoon dried rosemary if fresh isn’t available)
- 1 teaspoon sea salt (adjust to taste)
- 1/2 teaspoon freshly ground black pepper
- 1 tablespoon maple syrup or honey (optional, for a subtle touch of sweetness)
- 1 clove garlic, minced (optional, for a savory depth)
If you’re short on butternut squash, acorn or delicata squash make wonderful substitutes — just adjust the roasting time slightly, as smaller or thinner varieties will cook faster. I remember once trying this with kabocha squash when I was living out west, and the velvety texture was a delightful surprise. Just be sure to keep the cubes roughly the same size so they cook evenly.
Instructions
- Preheat your oven to 400°F (200°C). Line a large baking sheet with parchment paper or lightly grease it to prevent sticking.
- In a large bowl, toss the cubed squash with olive oil or melted butter until every piece is lightly coated. This step is key to getting that golden, caramelized exterior.
- Add the chopped rosemary, salt, pepper, and minced garlic if using. If you like a touch of sweetness, drizzle the maple syrup or honey over the squash and toss again to combine evenly.
- Spread the squash out in a single layer on your prepared baking sheet. Crowding the pan will cause the squash to steam rather than roast, so give the pieces some breathing room.
- Roast in the preheated oven for 25-30 minutes. About halfway through, use a spatula to flip the squash cubes gently, so they brown evenly on all sides.
- Look for a golden-brown crust on the edges and tender flesh when pierced with a fork. If you want a bit more caramelization, you can broil for an additional 1-2 minutes, but watch carefully to avoid burning.
- Remove from the oven and let the squash rest for a few minutes. This little pause helps the flavors settle and gives you time to savor the aroma — a moment I always cherish, reminding me of Mama Lu’s kitchen, where the best part of cooking was often the anticipation.
Find it online: https://claracooking.com/rosemary-roasted-squash/
